Sunday 23 April 2017

April 23, 2017

Oracle APEX dynamic Action Plugin Atom Calculator

Atom Calculator is a dynamic action plugin that allows users to perform calculations in real time during data entry by providing a popup calculator for the Input and get the final result.


Donation

Your support means a lot.
Donate

Changelog


1.0 - Initial Release


Install

  • Import plugin file "dynamic_action_plugin_com_planetapex_atom_calculator.sql" from src  directory in the git Hub repository  into your application
  • (Optional) Deploy the CSS/JS files from "src" directory on your webserver and change the "File Prefix" to webservers folder.

Preview


Oracle Apex Atom Calculator Plugin

Demo Application

Atom Calculator Application

Plugin Features

  • 2 Views to choose from.
  • Custom Calculator Font Awesome Icon.
  • Text Alignment
  • Various On Show events like click, focus
  • 10 Display Positions to choose from.
  • 3 Themes to choose from.
  • 3 Button Styles.
  • Custom offset to adjust the display position.
  • Button Press Animation.
  • Keyboard Numeric Keypad for calculation.
  • Running Total Cacluations.
  • Read Only option.
  • Up to 8 decimal points rounding.

Plugin Settings


Atom Calculator Views

Users have 2 options for the atom calculator view:
  • Basic view displays calculator without the percentage, PlusMinus and Keys.
  • Extended view will display all the keys.

Styling

Themes and Button Styles can be used to style the Atom calculator.
There are 3 themes provided:
  • Light
  • Dark
  • Matetial
There are 3 Button Styles:
  • No Style, which is Flat
  • Style 1
  • Style 2

Show Method

Selects the method when the atom calculator displays.
Available options include:


On item click
The atom calculator pop-up displays when the item is clicked.
On icon click
The atom calculator pop-up displays when the icon is clicked.
On item and icon click
The atom calculator displays when the item or icon is clicked.
On focus
The atom calculator pop-up displays as soon as the item receives focus.


Display Position

Position of atom calculator is relative to text input.
  • First value is name of main axis, and
  • Second value is whether the atom calculator is rendered as
    • Left(Leftwards)
    • Right(Rightwards)
    • Up(Upwards)
    • Bottom(Downwards)
Available options include:
  • Bottom Left
  • Bottom Center
  • Bottom Right
  • Right Bottom
  • Right Top
  • Top Left
  • Top Center
  • Top Right
  • Left Top
  • Left Bottom
Examples
Right Top will set atom calculator's position from right side upwards of text input.

Monday 10 April 2017

April 10, 2017

How to use Font Awesome Animation Library in Applications

Since Oracle Apex (Apex ) already incorporates the amazing font awesome icons library . Its time to add some dazzle to those static icons. Font awesome already has a few animation parlor tricks up it's sleeves. However, I found that adding some of these extra animations wouldn't hurt.

So lets dive in
  • Get the Font Awesome Animation Library from download .
  • Upload the minified CSS under the Shared Components =>  Static Application Files
    Check out How to upload section in the How to add CSS Files to Applications.
  • Once uploaded, copy and remember the the Reference e.g.
    #APP_IMAGES#css/font-awesome-animation.min.css
  • Add Font Awesome Animation Library to the Application at the User Interface Level so that Its available through out the Application.
    Check out the User Interface Level section in How to add CSS Files to Applications.

Using Font Awesome Animation

Now, adding animation to the font awesome icon is a matter of adding the relevant CSS classes.
Here are a few concepts:
  • To start animation on document load use "animated" class
  • To start animation on hover use "animated-hover" class
  • To start animation on hover over the parent element use  "faa-parent animated-hover" classes
  • For animation speed , not specifying any speed class would render as standard, or use "fa-slow" or "fa-fast".
Here are the animation classes which you get from the website:
  • faa-wrench
  • faa-ring
  • faa-horizontal
  • faa-vertical
  • faa-flash
  • faa-bounce
  • faa-spin
  • faa-float
  • faa-pulse
  • faa-shake
  • faa-tada
  • faa-passing
  • faa-passing-reverse
  • faa-burst
An example would be to use the following classes
faa-tada faa-parent animated-hover fa-slow
Font Awesome Animation can be applied to any component on the page, whether the component is using font awesome icon or not.
Checkout this

Demo Animated Application

Applying Font Awesome Animation to a Button

Create 3 Buttons in a region  as following:

APEX Font Awesome Animation


APEX Font Awesome Animation


Icon Only Animation

Vista Theme
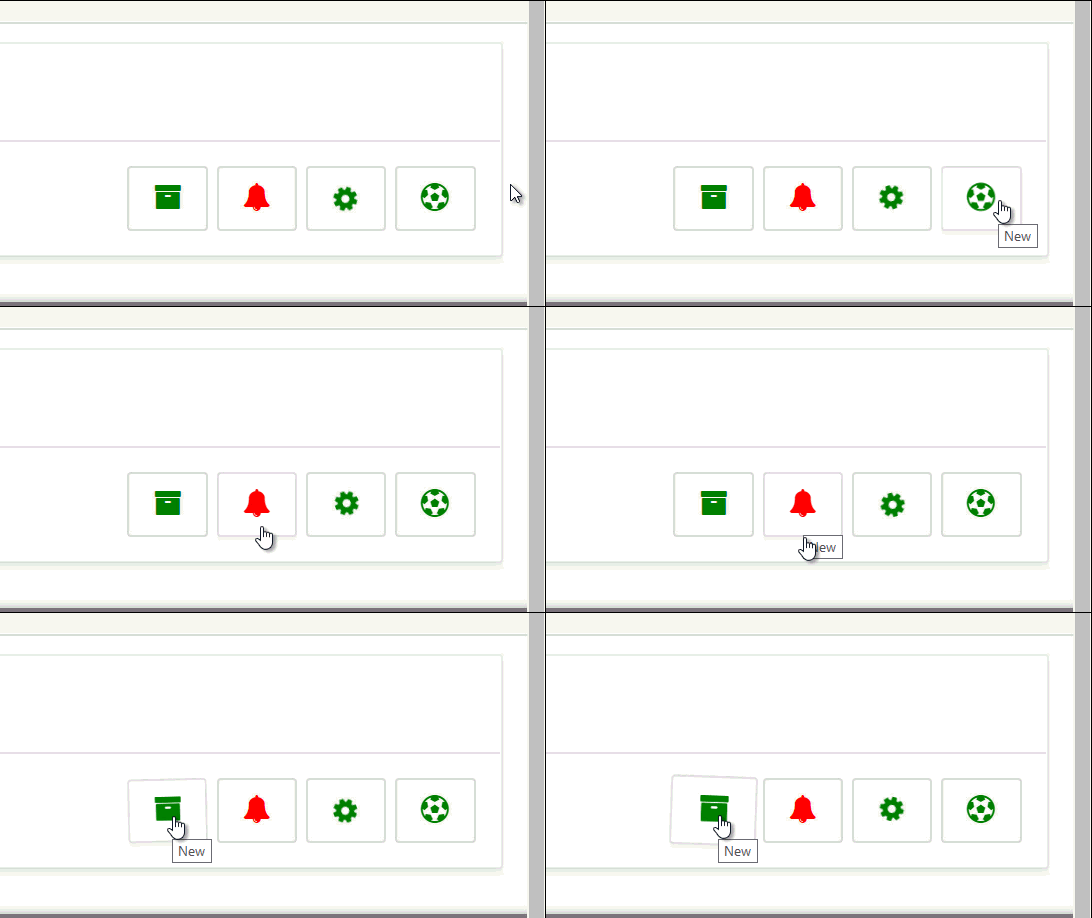
If you want to animate the icon only  and not the parent i.e button element ,you can enter the font awesome icon class as well as the animation classes in the Button Attributes => Icon CSS Classes attribute as shown in the image above. e.g fa-bell faa-wrench animated-hover fa-slow

    OR you can assign static id to each button,  I have assigned gear id to a button,  and then Go to Page Attributes => Execute when Page Loads and add the following.

apex.jQuery('#gear span').addClass('faa-spin animated fa-slow');


Vita Theme Issue
In Vita Theme, the Hover effect does not work. So I have devised a solution using jQuery
As an example the button has the following attributes:
id:bell
Icon CSS Classes:fa-bell faa-wrench fa-slow

Page Attributes => Execute when Page Loads and add the following.

$('#bell')
.on('mouseover', function () {
$(this).find('span:first').addClass('animated');
})
.on('mouseout', function () {
$(this).find('span:first').removeClass('animated');
})


APEX Font Awesome Button Animation
Font Awesome Button Animation

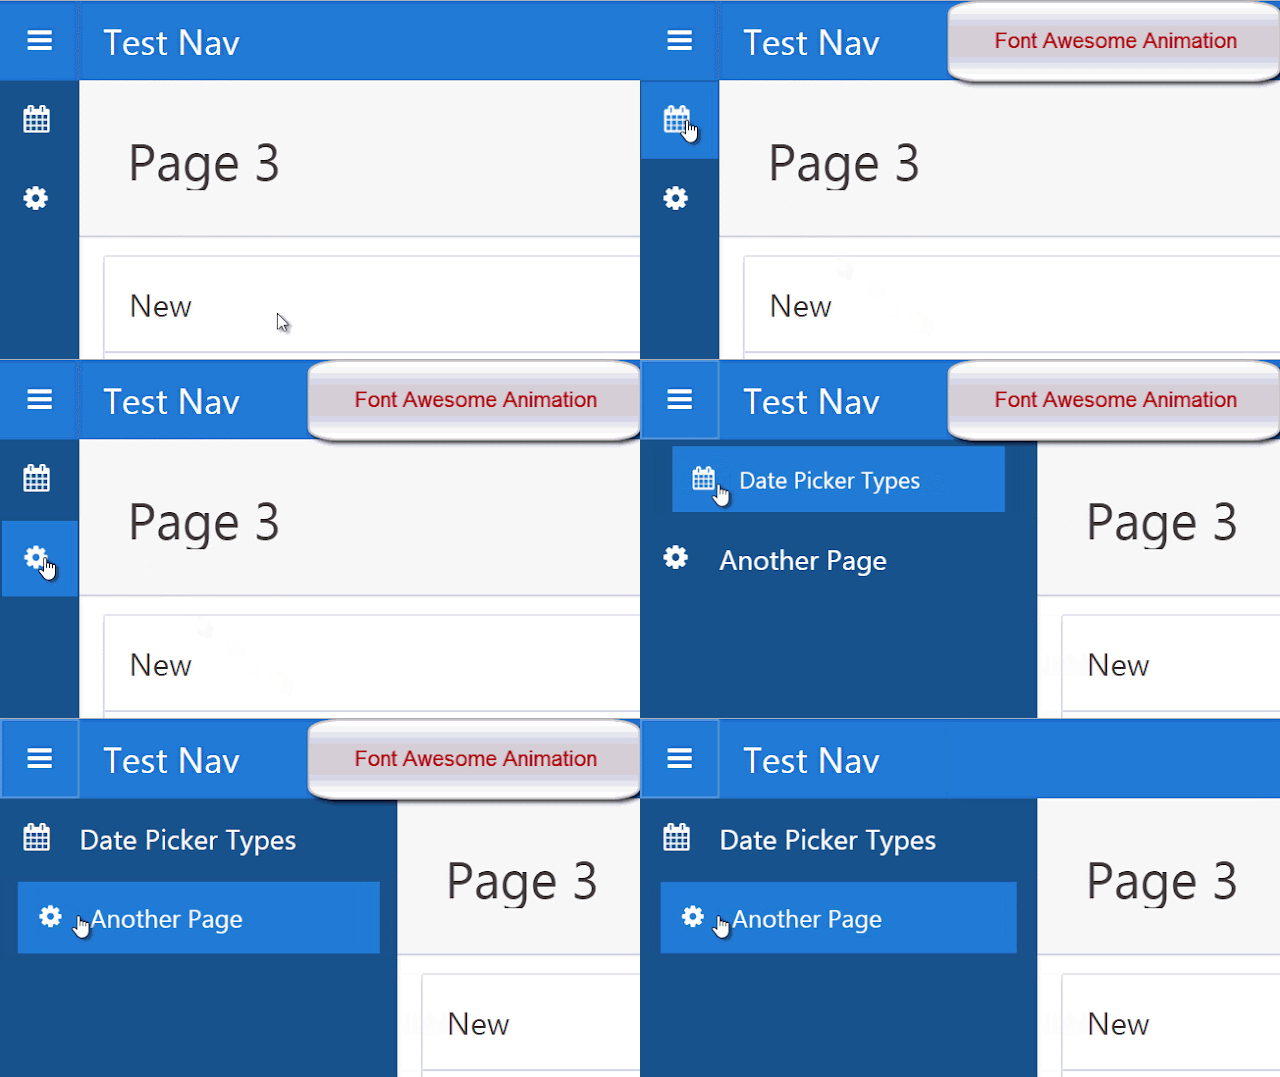
Applying Font Awesome Animation to Side Navigation Bar

I am using the standard side bar navigation template. Since Standard templates do not allowing editing that’s why you have to copy and edit the new template.
Go to Shared Components =>User Interface Section=> Templates => Copy Side Navigation Menu to Side Navigation Menu New => Edit Side Navigation Menu New template => Side Navigation Menu New => Execute when Page Loads
and add the following:
$('#t_TreeNav .a-TreeView-node').addClass('faa-pulse faa-parent animated-hover fa-slow');
Make it your default template.
Go to Shared Components => User Interface => User Interface Attributes => Edit User Interface => Navigation Menu => List Template => Side Navigation Menu New
Apex Font Awesome Side Menu Navigation Animation
Font Awesome Side Menu Navigation Animation
I have to say that imagination is your limit and practice your tool. So e.g if you wanted to use different animation for each navigation item

You may

  • Create a New Side Bar Navigation Template and use the A01...A10 substitutions in the relavent places to be later replaced by animation classes from the list query. 

OR
  •  Use javascript e.g set a class  lets say anim-item  along with animation classes for all items in the list definition :
       
Shortened Code snippet
  select null as lvl 'Date Picker Types' as label,
      'fa-calendar anim-item ==faa-pulse animated-hover fa-slow==' as icon,
Union All
select null as lvl,
       'Another Page' as label,
       'fa-cog anim-item ==faa-spin animated-hover fa-slow==' as icon,

  • then in Side Navigation Menu New  Template => Execute when Page Loads 
   use jquery selector $('anim-item') and foreach , extract the class string and remove the  ==faa-spin animated-hover fa-slow==  from class of that item and then traverse through parents till you reach the Side bar Navigation Item and addClass  faa-spin animated-hover fa-slow to it , so each  Item will have it's own animation.


Side Navigation Bar Icons Only Animation


If you want to animate the Icons only then keep the standard Side Navigation Template , However use a List based on the following query :

select null as lvl,
       'Date Picker Types' as label,
       'f?p=' || :APP_ID || ':10:' || :APP_SESSION as target,
        10 as c,
       'fa-calendar faa-pulse animated-hover fa-slow' as icon,
        null as ia,
       null as iaa,
       null as attribute1,
       null as attribute2,
        null as attribute3,
       'title' as attribute4     
from dual
Union All
select null as lvl,
       'Another Page' as label,
       'f?p=' || :APP_ID || ':11:' || :APP_SESSION as target,
        11 as c,
       'fa-cog faa-spin animated-hover fa-slow' as icon,
        null as ia,
       null as iaa,
       null as attribute1,
       null as attribute2,
        null as attribute3,
       'title' as attribute4   
from dual
Union All
select null as lvl,
       'Yet Another Page' as label,
       'f?p=' || :APP_ID || ':12:' || :APP_SESSION as target,
        12 as c,
       'fa-bell faa-wrench animated-hover fa-slow' as icon,
        null as ia,
       null as iaa,
       null as attribute1,
       null as attribute2,
        null as attribute3,
       'title' as attribute4   
from dual
Union All
select null as lvl,
       'Almost there' as label,
       'f?p=' || :APP_ID || ':13:' || :APP_SESSION as target,
        13 as c,
       'fa-bicycle faa-passing animated-hover fa-slow' as icon,
        null as ia,
       null as iaa,
       null as attribute1,
       null as attribute2,
        null as attribute3,
       'title' as attribute4   
from dual
Union All
select null as lvl,
       'Not So Far' as label,
       'f?p=' || :APP_ID || ':14:' || :APP_SESSION as target,
        14 as c,
       'fa-fighter-jet faa-horizontal animated-hover fa-slow' as icon,
        null as ia,
       null as iaa,
       null as attribute1,
       null as attribute2,
        null as attribute3,
       'title' as attribute4   
from dual


Saturday 8 April 2017

April 08, 2017

How To Add Custom CSS Files To APEX Application

How To Add Custom CSS Files To APEX Application

CSS can be added to APEX application inline or as CSS File(s). We all know how web developers suggest on keeping the presentation, content and behaviour separately. So as a good practice for production applications, we should place all our Inline CSS in CSS files.

Depending on your requirements, you can add custom CSS Files to your application at the
  • Page Level
  • Page Template Level
  • Theme Style Level
  • Theme Level
  • User Interface Level

Uploading files to Apex


A short primer on uploading the CSS files before adding to application The first thing you need to do is storing your file in a location which can be easily available to APEX.

The files can be uploaded to APEX or placed in the Image path folder.

Uploading files to Apex can be done via the Shared Components =>  Files Section

Application Static Files
Static Application Files are local to the application as the name suggests.
Static Workspace Files are local to the workspace and thus to all application sharing the workspace.

Files placed from OS in Image Prefix directory can be accessed by all Workspaces and Applications.

When a file is uploaded to APEX, it will provide a reference like:
 #APP_IMAGES#css/fonta.min.css
 #WORKSPACE_IMAGES#css/fonta.min.css

When fonta.min.css is placed in a css folder in Image Prefix directory on the server, can be referenced as

#IMAGE_PREFIX#css/fonta.min.css

Ok, Now Lets get back to add CSS Files to APEX.

Page Level


Placing CSS File at the Page Level will restrict it only to the specific page.

For Page Level add your CSS Files reference to Page Definition =>  CSS => File URLs
APEX Page Definition CSS URL
Page Definition CSS URL

Page Template Level


Placing CSS at the Page Template Level will make the CSS available to all the pages using the specific Page Template. This can be used for specific pages to use CSS customization. However for the entire application, you will have to edit each of the Page template.

Go to Shared Components =>User Interface Section=>Themes=> Tasks list => View Templates.

Let's say I use Standard Template , So copy it and name it something like Standard Template New.
Select the name of the page template you want to edit.

Use a <link> tag within the head section to reference the appropriate style sheet.

Go to the Header Section Text area

Find #HEAD# substitution and add the following below it.


 So that its looks like below
Template Definition
Now make the Standard Template New your theme default page by going to Shared Components => Themes => Create / Edit Theme , then go to the component defaults and set your page template to Standard Template New.

Also you have to make sure that you add
 <link type="text/css" rel="stylesheet" href="#APP_IMAGES#css/fonta.min.css" >
 to each of your page templates that you would use.

Theme Style Level

This can be used to make CSS File available across the entire application. However as the name suggest the CSS Files are specific to the Style in use.

Start using another Style from Theme roller for example, and you will loose the CSS file availability.

Go to Shared Components => Themes => Create / Edit Theme => Styles Section
Apex Them Styles
Theme Styles
Go to  Settings => Files URLs and add the your CSS reference URL
#IMAGE_PREFIX#css/fonta.min.css
Apex Theme Style Definition
Theme Style Definition

Theme Level


Theme Level can be used to integrate custom font icons libraries as is suggested in the following post:

Apex 5.0 Font Awesome Integration

 Its a great way for CSS Masters to user their own font icon libraries in Apex Applications.

User Interface Level

In APEX 5 and onwards , User Interface provides a centralized place to add your custom CSS file to the Entire Application.

So no need to mess around with Themes, Page Templates and Styles.

Just add as following:

Go to Shared Components =>  User Attributes  => Edit User Interface =>  CSS File URLs Section
APEX User Interface Attributes
User Interface Attributes


APEX User Interface Edit
User Interface Edit


APEX User Interface CSS URL
User Interface CSS URL


A reev a dérchi for now.